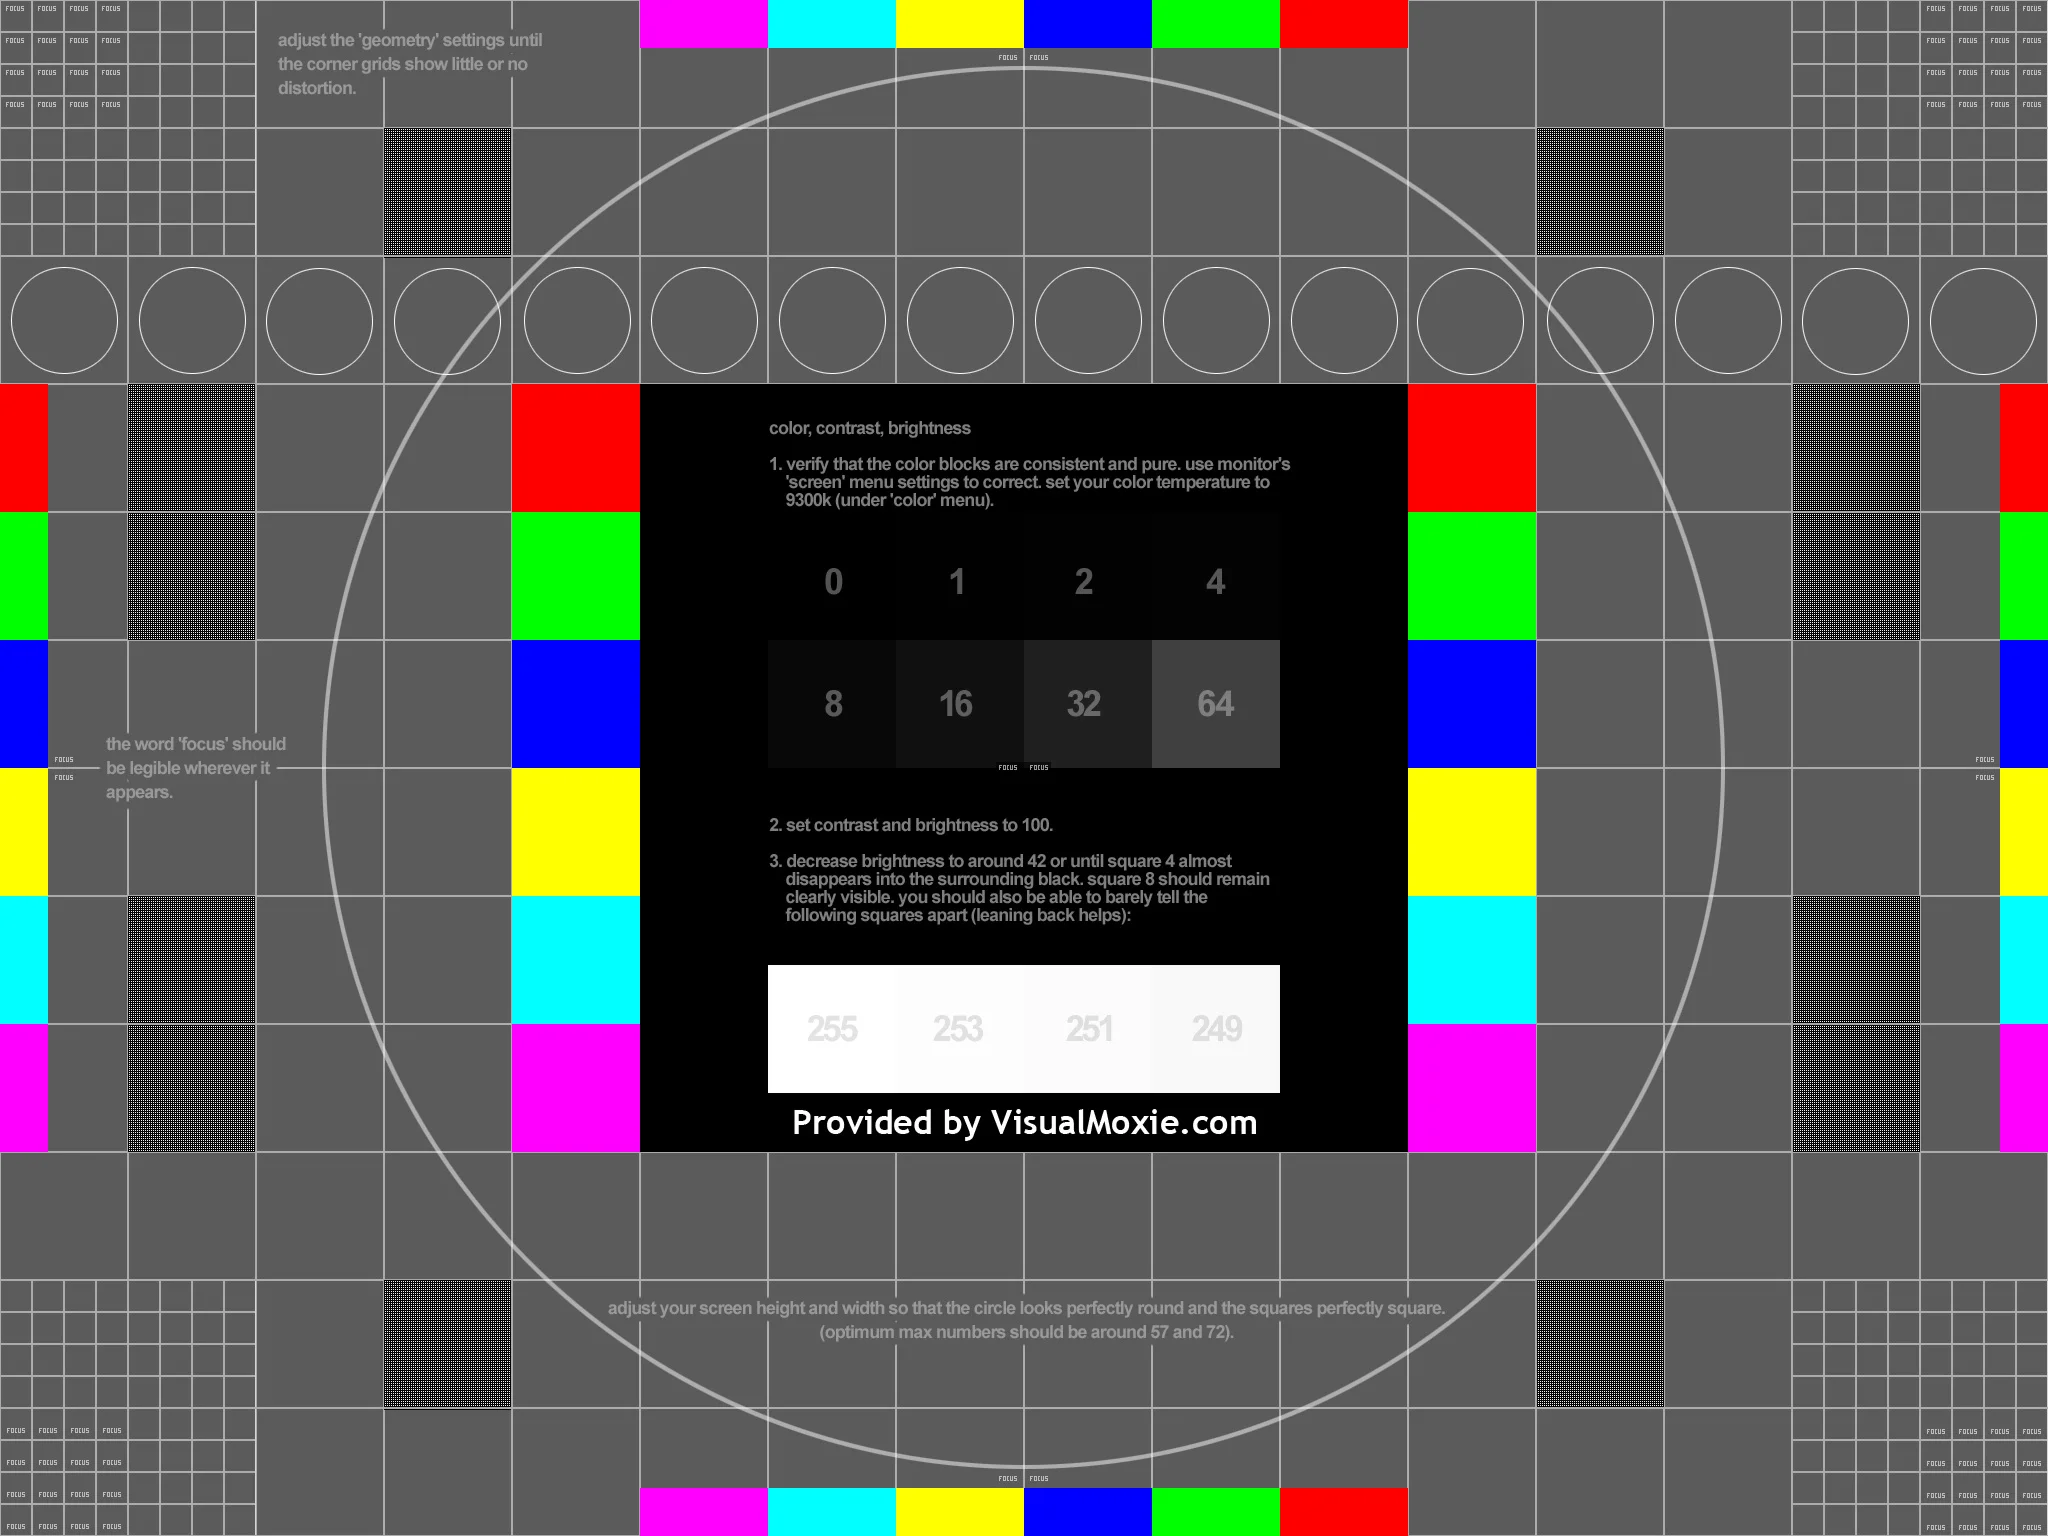


COLOR GRADING TIPS

A Polish software engineer (and amateur photographer) named Michael Bemowski recently put together one of the most helpful depth of field tools out there, and the best part is that it's completely free. The tool, which you can find here, allows you to manipulate every camera and lens setting that affects depth of field, from sensor size to focal length, from aperture to the distance between the subject and the camera. Plus it gives you a handy visual approximation of what each specific set of parameters would look like in a real world setting.

n order to make this tool as accessible as possible, you can download a version of it that runs offline on any operating system, and there is a dedicated mobile version as well, so you can access it anywhere at any time.
Nucoda colour grading and mastering solutions have been used on many of the best known films, commercials, documentaries, music videos and television programs around the globe.
Nucoda
The premium colour grading and finishing solution for feature films, commercials and broadcast applications.
Nucoda combines a creative tool set with a very tight integration to the Avid workflow, including full support for Interplay. Setting new standards in the highest quality, Nucoda is a fully featured ACES grading system, featuring HDR grading and real time EXR file format support. With an industry leading colour toolset used by clients such as Keep Me Posted, Encore, Pixar and Disney, Nucoda creates complex looks and visual styles for animation, working in 2K/4K and stereo. Included with Nucoda is a range of image processing tools called DVO Classic, consisting of DVO Grain, DVO Aperture, DVO Regrain and DVO Brickwall.

Nucoda Look
An entry level grading solution based on the industry-leading Digital Vision image science technology and Nucoda colour tools. Nucoda Look is ideally suited for use as a pre-grade assist station, either in the post production facility or on-set. It can be used as a preparation station for the Nucoda grading system to ingest or conform video or film content directly onto the timeline. It is also an excellent post-grade deliverables system.
LUT means “Look Up Table.”
A LUT (Lookup Table) is essentially the modifier between two images, the original image and the displayed image, based on a mathematical formula. There are different types of LUTS – viewing, transform, calibration, 1D and 3D.
It’s helpful to think of it like a math problem: R= S+L
“R” being your result or what you want to attain.
“S” being your source or what you start with.
“L” being your LUT or the difference needed to make up between your source and your desired outcome.
In all cases of LUT use, the LUT is the means to make up the difference between source and result.((All cases assume the colorist (or you) is grading through a correctly calibrated monitor for evaluation and finishing. LUTs in no way replace proper calibration or color correction. They only assist in the process.)) It’s never the result by itself. How does this play out? I’ll layout a couple probably over-simplified examples:
Types of Lut
1D, or one dimensional, LUTs are LUTs that usually have an exact output value for a corresponding input value. 1D LUTs are limited in that they cannot alter color saturation without affecting contrast or brightness along with it.
1D Luts are excellent for setting contrast, the white point of a display, or overall color balance adjustments but they do little to convey the complexities needed for creating a good looking image when grading.

BMCC FILM LOG - 1 D LUT Applied
3D, or three dimensional, LUTs are LUTs that affect a coordinate set of colors. As an example, an RGB coordinate of (0, 0, 448) would be directly transformed to (128, 0, 832). If a 3D LUT had corresponding matches for each coordinate set, the files would be large and difficult for software to use. 3D LUTs usually have a set of 17 coordinates on each axis (red, green, and blue) from which other values are interpolated to various levels of accuracy.
3D LUT places color and luma in a 3D space (often referred to as a cube) that’s much more representative of how color works in the real world. And for our purposes, a 3D LUT is much more useful for capturing and relaying complex color grades than a 1D LUT.
BMCC FILM LOG- 3D LUT APPLIED
LUT Formats
There are a number of LUT formats in use today including Iridas .cube, Iridas, .look, S.two LUT, Blackmagic Gamma Table, Clipster LUT, Sony SRW LUT, FilmLight TrueLight LUT, Thomas LUTher Box LUT, 3DL, ASC CDL, CineSpace LUT, and Luster LUT. Besides inherent differences between 1D and 3D LUT files, these formats are vastly similar in that they contain lists of color values or coordinates. Iridas provides examples of some LUT formats in their online documentation.
Programs like Adobe Speedgrade, Adobe After Effects, Adobe Photoshop, and Blackmagic DaVinci Resolve support multiple formats.
LUT Bit Depth
LUTs usually provide an accuracy of 8 bits (values 0-255), 10 bits (values 0-1023), 12 bits (values 0-4095) or 32-bit floating point (values from 0.0-1.0). Most programs will create new values linearly to make up for differences in bit depth (i.e. an 8-bit LUT applied to 10-bit video) which allows for smoother color transition and reduced banding.
LUT vs. ICC
ICC color profiles are another way of changing color but are usually reserved for input (called scene referred) or output (called display referred) calibration and matching. Proper color matching requires both an input and output profile. These profiles are linked by conversion to an intermediate color space like CIELAB (L*a*b*) or CIEXYZ so Device A can reliably work with Output A, B, or C. LUTs are considered a direct transformation and are far less useful for calibration purposes unless the LUT was designed with both a specific input and output in mind.

BMCC Film Log - 3D LUT applied (Cave Dwellers)
Color Correction
A very common example is printing your final film to…real, actual film. Print film came in a variety of flavors and styles. Each style had different nuances in color. The film lab would have all that nuance information or be able to send you a print test to work with. That would be your final result. The colorist grades a picture on his calibrated monitor but if he were to send that to print, it could come out looking far different due to the nuances of the physical film.
So in our math analogy, his graded film is “S” and his film print is “R.” He then uses the information from the film lab or on his own, creates and applies the LUT or the “L” to get him from his graded film to the print and to have it look as intended after it’s on the physical film. After applying the LUT, his graded film may look awful on his monitor, but will come out correct on the film print.

BMCC Film Log - Color graded by Sudip Shrestha

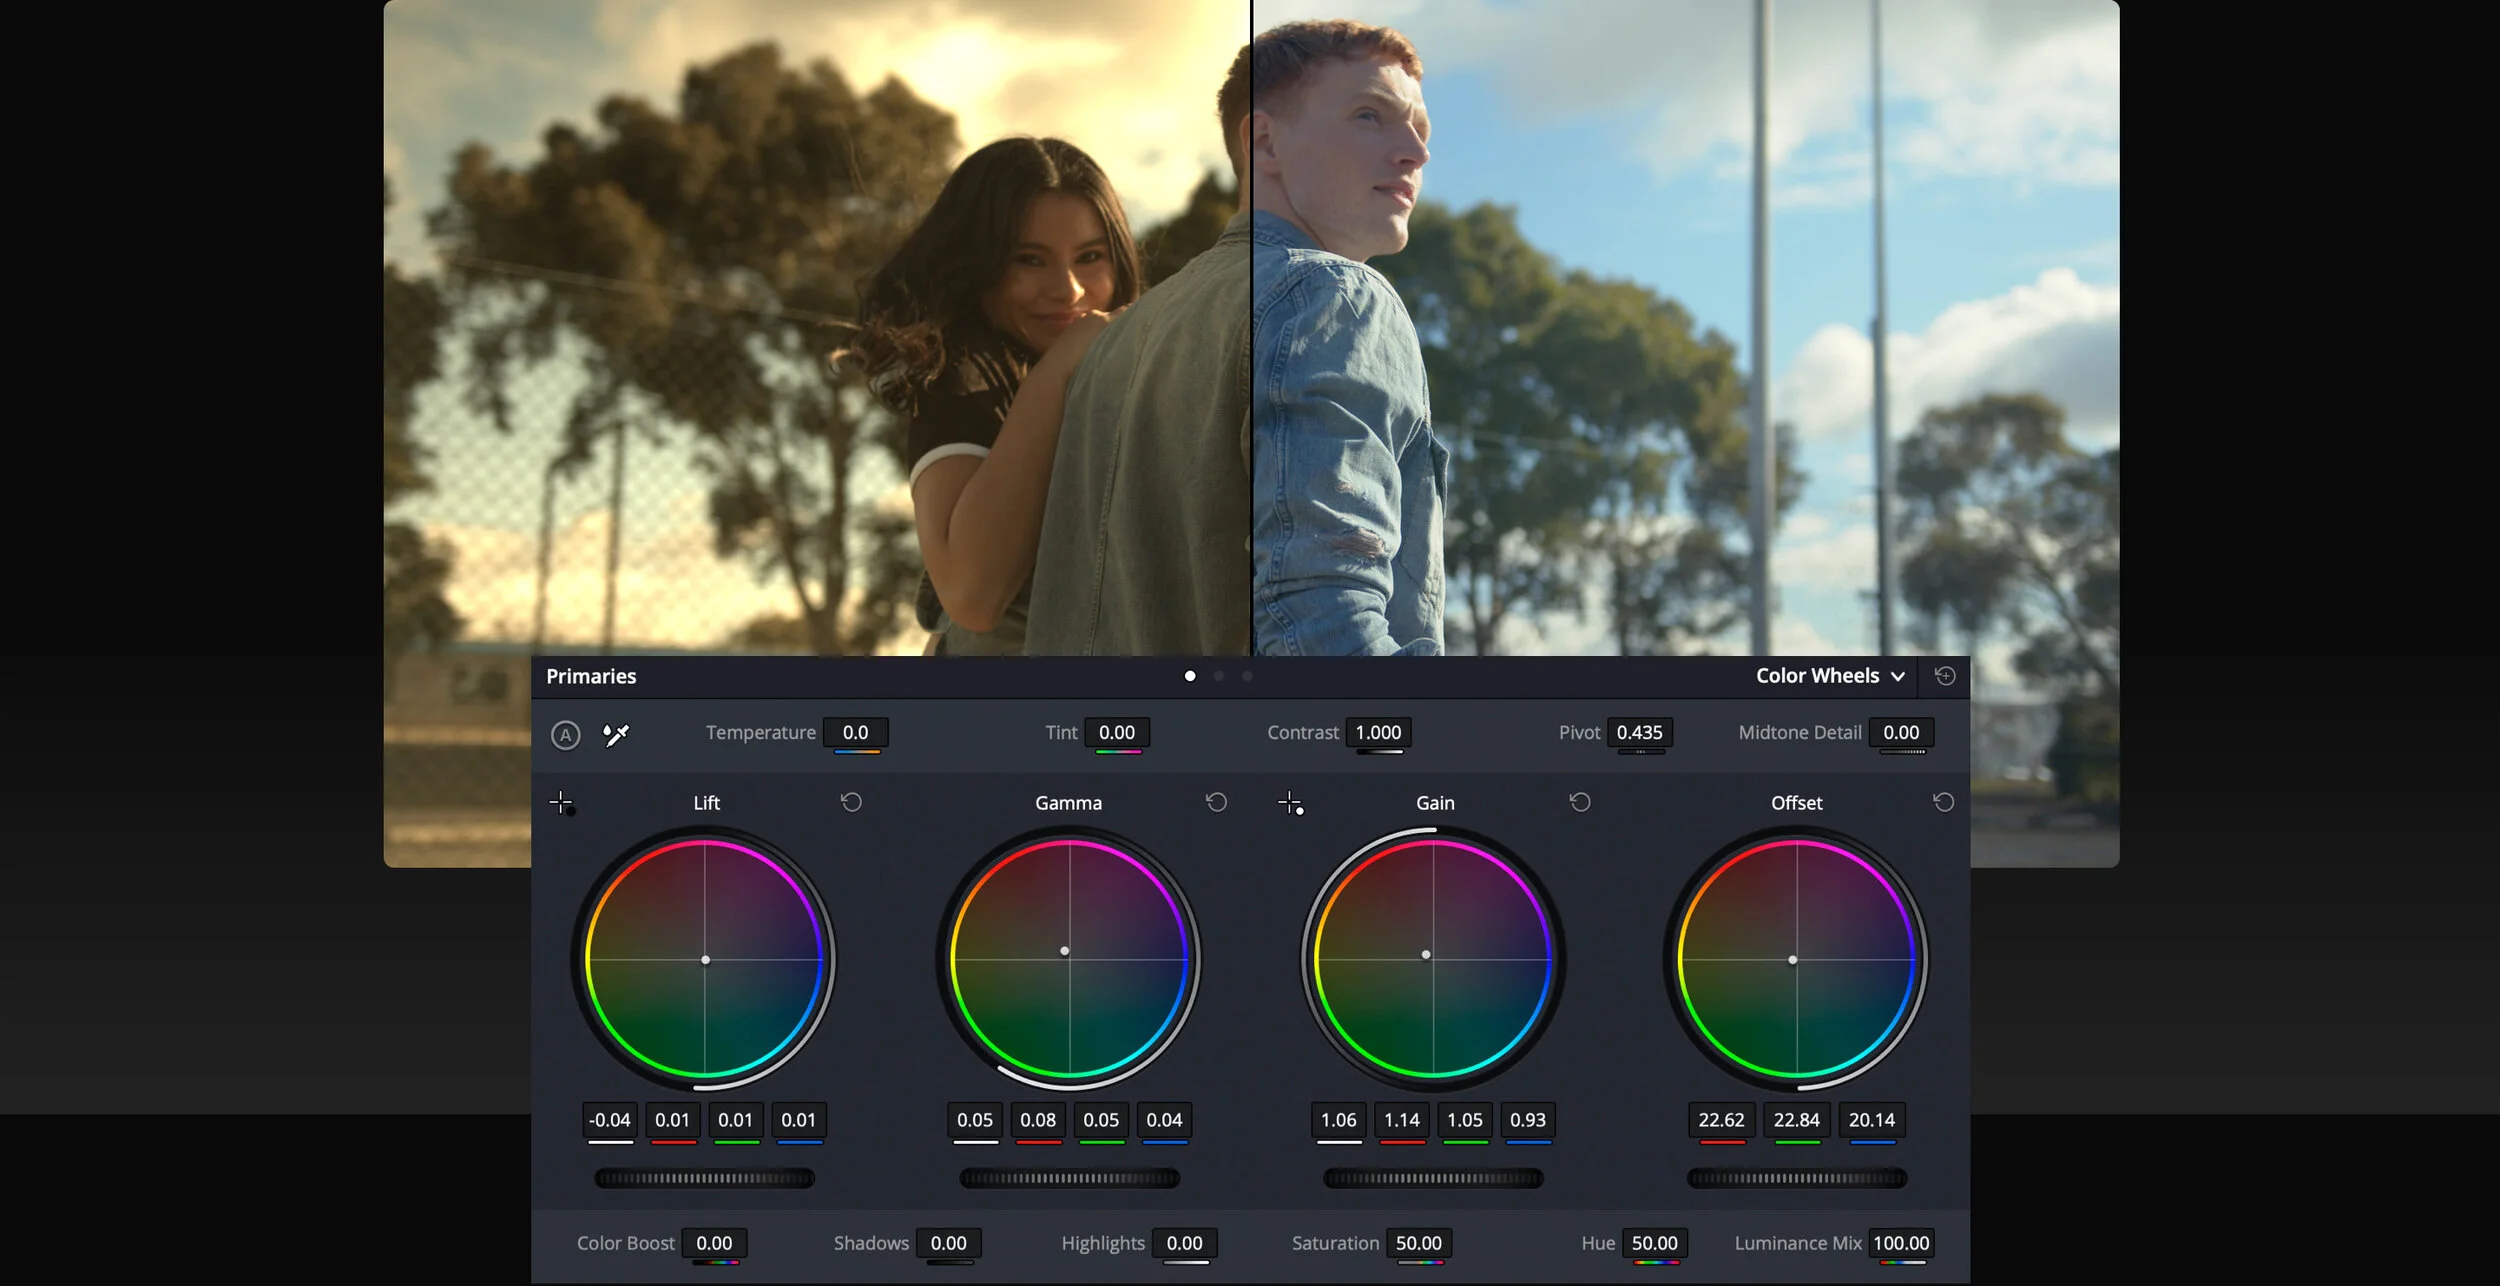
COlOR GRADING NODE STRUCTURE IN DAVINCI RESOLVE 11 (CLIP/TIMELINE)
Color Calibration
The other option our colorist could take is to apply his film information to his monitor first -- before starting in on his color correction -- so he’s grading as if his movie is already on film. It looks good to him on his monitor now, but if he were to grade the entire film and then upload it to the web or play a different project through his monitor, it wouldn’t look correct because he applied his LUT to his monitor first. While this is a common method to calibrate monitors for normal REC709 and P3 grading, that’s more advanced than I want to get into right now.
The key takeaway here is that LUTs are not used to creatively grade a final result, they’re used to make up a difference between a source and a result. In practical application -- with theCineStyle profile, for instance -- the LUT will let you view your footage during editing more naturally than the flat, desaturated image originally recorded. However, it’s best to remove it for final color grading and rely on your properly calibrated monitor to tell you what color it is and yourself to determine what color it should be. If not used carefully, improper LUT use could screw up your footage or limit your image manipulation options in post.
Nobody says you can’t apply a LUT for a creative grade, but be forewarned: if your shots don't match each other to begin with, they're not going to match after you’ve applied the LUT. In this instance, you’ve basically turned the LUT into a glorified color correction filter, which is not what it's intended to be.
Are LUTs perfect?

BMCC Film Log - 3D LUT applied (Kodak 2383 D65)
No, they’re not. To achieve speed, they must sacrifice accuracy. E.g., a 10-bit image has 1024 values per channel. R x G x B = 1024 x 1024 x 1024 = a billion colors. For all practical purposes, a 3D LUT cannot be one billion pieces big, or it will defeat the purpose.
Instead, what LUT generators do is define the size of the LUT to a number that achieves good approximation for practical purposes. A common number is 17 points, instead of 1024. 17 x 17 x 17 = 4,913. Isn’t this way low? Actually, no, because the human eye isn’t that perfect. The 3D LUT only calculates these points, and the rest are interpolated (also calculated, but in a ‘broad mathematical sweep’ sort of way).
There is a lot of discussion about whether LUTs are good for critical color grading work. Some people think they are a travesty, while others welcome them. One place where LUTs are definitely valuable is in monitor calibration and viewing, quick image processing on set and computer graphics applications.
When you’re choosing between a 1D LUT and a 3D LUT, go for the option that makes your life easier. Both are compromises. Sad, but true. If they were perfect, they would too large and too slow to be useful for our crazy budgets.
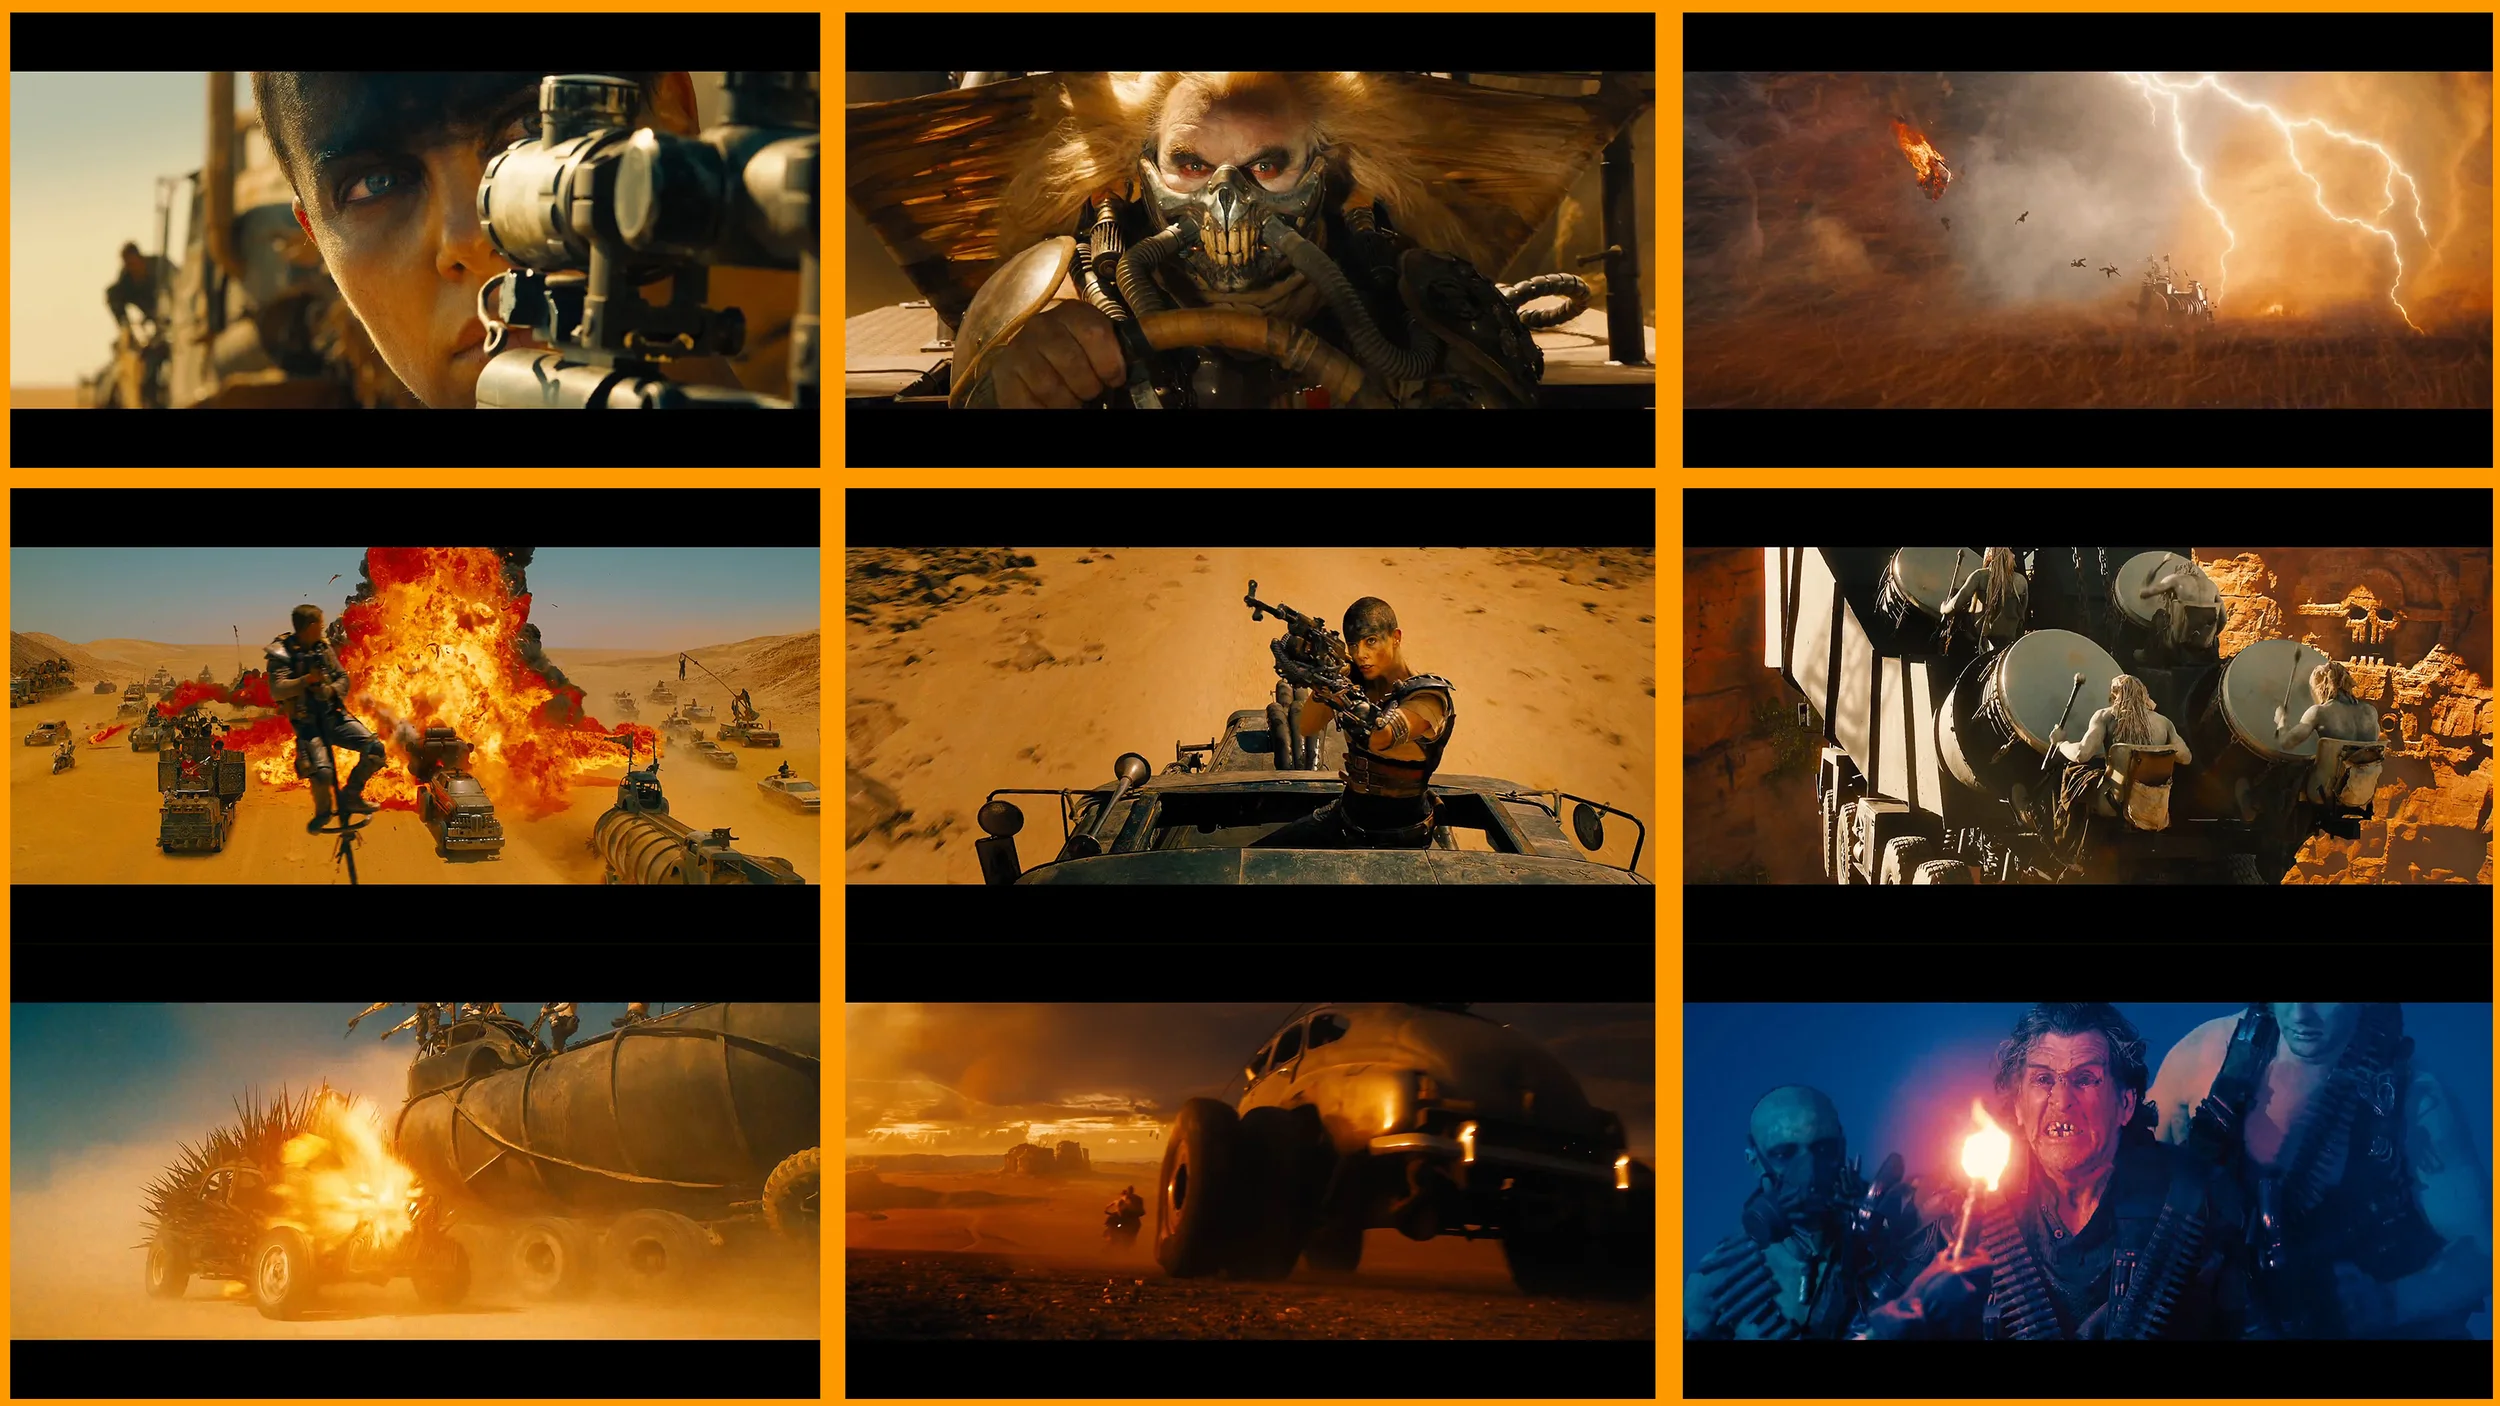
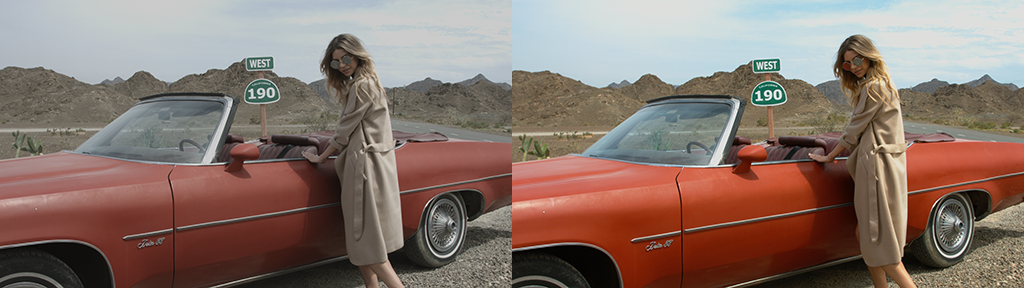
With the invention of digital color-grading, the practice of tweaking the palette of films in post-production has exploded. So is the future all orange and teal?
You might have noticed a color revolution in cinema recently, because Hollywood seems to gave gone teal-and-orange crazy. Studio films from Hot Tub Time Machine to Iron Man 2 have used the combination, with the greenish-blue teal forming a backdrop and the orange (which includes flesh tones) in the foreground. The film blogger Todd Miro has suggested it's all down to the colors being complementary: "Anyone who has ever taken Color Theory 101 knows that if you take two complementary colors and put them next to each other, they will 'pop', and sometimes even vibrate," he wrote, posting dozens of stills from the year's big movies, united by the prevalence of teal and orange.

Back in the day, if you wanted your movie to have an artistic, stylish color palette, you had to go through the pain in the ass process of using filters on your lights and camera, or get the footage exposed just the right way. It was expensive, it was difficult and it was limited to people who really knew what they were doing. So if someone took the trouble, it meant they had a good reason, dammit.

It's no conspiracy, though, says Stefan Sonnenfeld, a leading Hollywood colourist who worked on the Transformers films (Miro counts them among the main offenders). "There's no specific colour decision-making process where we sit in a room and say, 'We're only going to use complementary colors to try and move the audience in a particular direction – and only use those combinations,'" he says. "Every film has its own look. We are always pushing our tools and our creative capabilities on every project."

"Color-grading is an absolute necessity now," says Sonnenfeld, "Because there are so many different formats that are being used, from film stock to digital capture, semi-professional to consumer cameras. Blending all that stuff and having it work cohesively is a very important part of the process."
Digital Colorization

The big change that digitization made was it made much easier to apply a single color scheme to a bunch of different scenes at once. The more of a movie you can make look good with a single scheme, the less work you have to do. Also, as filmmakers are bringing many different film formats together in a single movie, applying a uniform color scheme helps tie them together.
One way to figure out what will look good is to figure out what the common denominator is in the majority of your scenes. And it turns out that actors are in most scenes. And actors are usually human. And humans are orange, at least sort of!
Most skin tones fall somewhere between pale peach and dark, dark brown, leaving them squarely in the orange segment of any color wheel. Blue and cyan are squarely on the opposite side of the wheel.
It seems plausible that, regardless of whether or not it has its origins in color theory, orange-and-blue has now reached the level of “convention.” For better or for worse, coloring your movie this way makes it really look like a movie.

But do colorists just execute directors' instructions, or are they artists in their own right? The lines have to be drawn on each job, and sometimes the colorists are forced to call the shots. As color grading technology continues to improve, we might see more filmmakers branch out into more novel palettes. Until then, keep an eye out for more orange and more blue.

CION™ is the new 4K/UltraHD and 2K/HD production camera from AJA. Shoot direct to edit-ready Apple ProRes 4444 at up to 4K 30fps, ProRes 422 at up to 4K 60fps, or output AJA Raw at up to 4K 120fps.
Each CION camera includes the following accessories as standard:
PRICE : $4995.00
For more details : www.aja.com
“DaVinci Resolve Lite includes all the same high quality processing of the full DaVinci Resolve. However it limits projects to UHD resolutions or less, a single processing GPU and a single RED Rocket card.”
Some limits:
1) You can only work in 4K or lower resolution
2) Only process on a single GPU and a single Red Rocket Card
3) No Stereo 3D support
4) No noise reduction, power mastering, remote grading and sharing
Colorista is an amazing product from the prolific mad genius of rebel filmmaker, Stu Maschwitz. When it was released it was, quite simply, the three-way color corrector that Adobe forgot to build in After Effects. It had primary and secondary color grading tools, skin tools, masking tools and it lived right there in the plug-in window.
The app has matured into an amazingly powerful color finishing tool that lives in most NLEs and After Effects as a plug-in, it’s called Colorista II and it’s US$199.
Red Giant released a free version of the app called “Colorista Free” that has just the three way color correction tool and numeric inputs. But when you combine this with the built-in tracking masks in Adobe Premiere CC 2014, you get a really stable, powerful primary and secondary color correction tool for free.
KineMAX is capable of Capturing and Recording 6K RAW without external recorder. KineMAX is honoured as one of three cinema camera models in this planet. 6K RAW is recorded as KineRAW(.krw) codec which is compressed lossless RAW format developed by Kinefinity. For 4K and lower resolution, it can record Uncompressed CinemaDNG; for 3K and lower resolution, it can record Cineform RAW which is easy to be edited and graded in mainstream DI software. 6K RAW capturing and recording leaves very large room for reframing, trimming, and CG, especially for 4K delivery. At same time, it also features capturing and recording 6K, 4K, 3K, 2K, 1080p in both S35mm frame and crop mode: that means KineMAX can cover from 1080p to 6K, every mainstream resolution in one camera. KineMAX may be the most compact and powerful cinema camera for 6K&4K RAW capturing and recording now.
KEY TECHNICAL FEATURES :
16 f-stops
KineRAW codec
100fps SLOW-MO
4K 4:3 Anamorphic
Super 35mm
KineStation
Built-in Cineform RAW
NEW LOCK-TYPE EF/F MOUNT
KineMOUNT Interchangeable Mount
CinemaDNG
3G SDI and HD Digital Display
M4/3 and S16mm
LIGHT-WEIGHT AND COMPACTPRICE $8000.00
Blackmagic Design announced Davinci Resolve 12 here at NAB this week. This new version includes 80 new features and significantly expands its video editing capabilities.
The new update will include significant improvements in the user interface, enhanced video editing including multi-cam, new media management tools including metadata filtering and smart bins, brand new professional audio engine with support for VST/AU plugins, 3D keyer, a new 3D perspective tracker, enhanced curve editing, and more.
Resolve 12 is planned for a July release for $995, but current users can upgrade for free.