The Cheapest Color Grading Panel OXYGEN PRO PANEL $800

Strong oxygen Oxygentec ProPanel MK II officially certified toner Taiwan 

A control surface is an essential piece of gear for professional color correction.

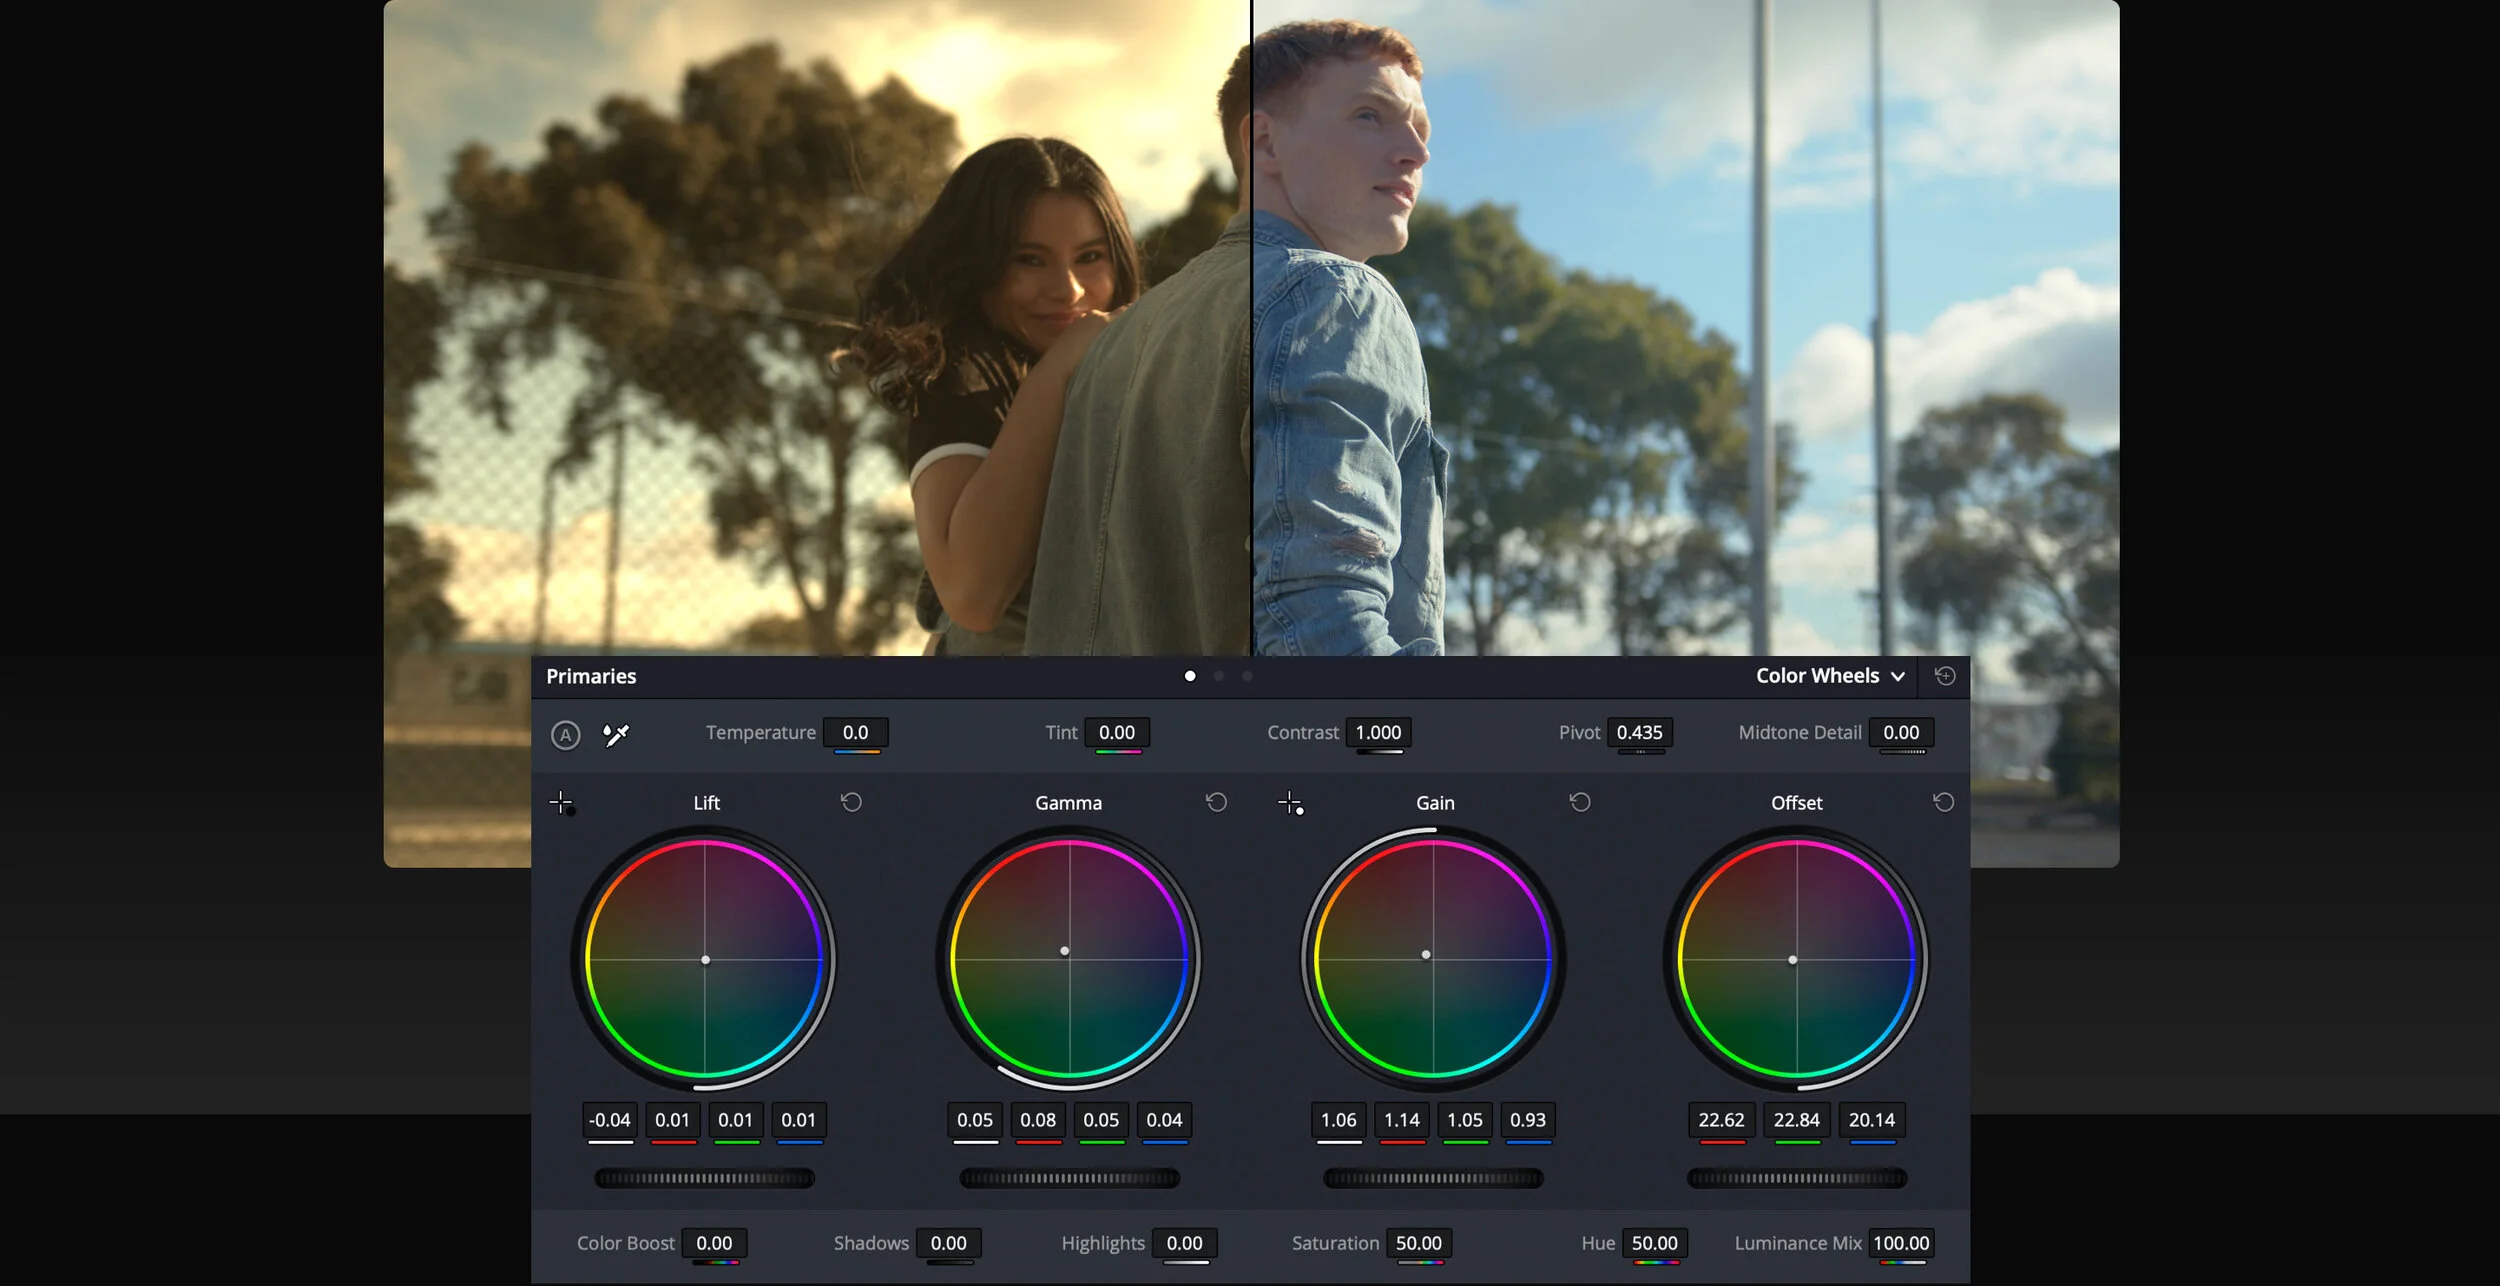
The new OxyenTec ProPanel's relatively straightforward interface accompanies the most critical elements for a control surface: the triple rings and dials for controlling shadows, midtones, and highlights. 

t just around $800, OxygenTec's board is most likely a less expensive distinct option for the JL Cooper Eclipse, the Avid Artist Color, the Tangent Element and even the more established Tangent Wave model. 

The DaVinci control surface maps a considerable lot of Resolve's capacities to devoted catches and handles, making reviewing a breeze. Be that as it may, its weighty sticker is out of scope for some. Fortunately, outsider surfaces from Tangent, JL Cooper,Avid and newcomer OxygenTec outfit a significant part of the DaVinci board at a small amount of the expense. With less catches and dials, you'll be looking through menus to discover the parameter to change, a long way from a major issue to numerous. 

The ProPanel is accessible now and incorporates locally with DaVinci Resolve, joining by means of USB. Beside the primary dials and trackballs, a few catches line the highest point of the control surface. From left to right, you have charges for

  • Undo
  • Redo
  • Grab Still
  • Play Still
  • Previous Node
  • Next Node
  • Start Dynamic
  • Mark for Keyframing
  • Base Memory (resets just the node you’re on)

No matter which model you choose, a control surface is an essential aspect of getting any job graded and delivered on time. 

Icolorsit Video Review

Davinci Resolve 12 - Beta Released

The latest version of Blackmagic's  Davinci Resolve 12, has arrived.

Davinci Resolve 12 - Beta version - Color Interface

Davinci Resolve 12 - Beta version - Color Interface

It has become so much more over the last few years, and in version 12, it's now a full-fledged non-linear editor. The free version is known as DaVinci Resolve 12 and paid version DaVinci Resolve 12 Studio.

They are essentially still the same products, and the free version still has the same limitations. With the nearly $1,000 Resolve 12 Studio (which is a free upgrade for previous owners of Resolve), you'll get support for multiple GPUs, 4K output, motion blur effects, temporal and spatial noise reduction, 3D tools, and remote and multi user collaboration tools. 

Whats New?

  • Enhanced 3D Tracker 
  • Brand New 3D Keyer for Color Correction and Compositing
  • Slick New Interface that's Cleaner, Easier on the Eyes
  • Multicam Editing with a Host of Sync Options
  • Improved Trimming including Advanced Simultaneous Multi-Track Trimming
  • Nesting Timelines for Working on Large Projects with Multiple Complex Timelines
  • On-Screen Controls for Manipulating and Animating Motion paths of Graphics
  • Highly Customizable Transitions Using Curves Editor with Bezier Handles
  • Real Time Audio Mixing by Recording Fader Moves
  • VST and Audio Unit Plugins for Full Control of Audio
  • Export to Avid Pro Tools for Professional Audio Mix
  • Improved Media Management and Bins
  • Download Davinci Resolve 12 - free version.

RED CINEMA - On Set - The Ultimate Workflow

 1. The Look Panel

For those new to grading, learn how each of the most commonly used tools work and when they’re useful. For those familiar with grading, learn how to make the most of the unique features and settings available with REDCINE-X PRO®.

Click on the image to view tutorial.

Click on the image to view tutorial.

DOWNLOAD RED CINE X FROM HERE

2. Saving Looks to the camera - 

By saving your look from REDCINE-X PRO® to your REDMAG® 1.8" SSD, custom grading can then be viewed in real-time with live footage on the camera’s preview screen. If at any point you want to change your look, REDCODE® RAW files allow you to revert back without compromising image quality.

Click on the image to view tutorial.

Click on the image to view tutorial.

QUICK TIP: If RED Watchdog is enabled for READ ONLY, be sure to change it to READ-WRITE in order to save Looks to the REDMAG

3. Sync Audio - 

From linking to R3Ds to selecting slate points, Dan from RED covers all of the basics you need to know to help you bring sound to your 4K/5K images.

Click on the image to view tutorial.

Click on the image to view tutorial.

4. DIT on Set -

DIT describes his workflow process as he preps the raw footage for dailes and editorial.

Click on the image to view tutorial.

Click on the image to view tutorial.

5. The Ultimate Workflow

Watch one continuous 18 minute take showing the easiest file-based workflow in the industry, as RED ROCKET®, REDCINE-X PRO® and a variety of tools create Avid, FCP and Premiere files in minutes, while live streaming to an iPad and conforming and grading on a Pablo 4K, all in real time.

Click on the image to view tutorial.

Click on the image to view tutorial.


GRADING SHOT IN RED - LOG VS LINEAR OVERVIEW

REDlogFilm and REDgamma are options in REDCINE-X® that affect how digital values are translated into visible tones. This article delves into how these and other gamma settings work, along with how they can be used to simplify post-production—regardless of whether this is with quick dailies or manually-graded feature films.

REDGAMMA3

REDGAMMA3

Use RED GAMMA - For Instant Results

With RED®, the gamma setting may also be comprised of other tonal curves. To give images the more pleasing and familiar toe and shoulder characteristics of film tones, REDgamma and similar settings are the net result of both a standard log curve and a contrast curve:
The contrast curve causes shadows and highlights to more pleasingly roll off into black and white, respectively, and improves contrast and color saturation within the more visually important mid-tones. Images will also appear to “pop” since they will seem more three-dimensional:

REDgamma4 is therefore a good starting point and typically requires the least color grading. It is therefore an ideal solution when needing a quick turnaround time with dailies and other demo footage.

On the other hand, a contrast curve is more subjective than the standard log curve. Just as each film stock had its own characteristic look, a given camera model, software package or production company can all have different styles. A given look may also depend on the output medium, creative choices and scene content. As a result, such looks can complicate post-production if applied prior to grading or visual effects by third parties. If these considerations are important, there’s another option . . .

REDLOGFILM

REDLOGFILM


Use REDLOGFILM - For Fully Manual Grading

REDlogFilm provides a more standardized starting point for manual grading because it only includes a traditional log curve. The particular curve replicates the well-supported response of Cineon film scans, which ensures predictable results with custom LUTs and other post-production software. REDlogFilm can also be easily translated back into linear when visual effects, image compositing and color matrix transformations are needed.

A typical REDlogFilm workflow therefore includes first converting the linear REDCODE® RAW (R3D®) file into one of several standard digital intermediate formats, using REDCINE-X PRO® or other software packages. Then, the output can be shared with post-production houses and all other third parties familiar with the Cineon specification. The final result incorporates a fully customized color grading that utilizes gamma-encoding:

However, REDlogFilm images will initially appear flat, with lighter and noisier shadows, along with darker and more abrupt highlights. Tones retain the full dynamic range and are not actually any noisier though—they are just being displayed differently. REDlogFilm is also not designed for visualizing exposure in-camera.

One should therefore only use REDlogFilm when files are expected to undergo substantial grading afterwards. This may require an experienced colorist and post-production team in order to get results that meet or surpass what can be achieved straight from the camera with REDgamma4. However, for teams that are familiar with grading log film scans, REDlogFilm is designed to be faster and simpler.

In practice, gamma can be specified both in-camera and from within REDCINE-X. In either case, the setting is embedded as metadata and does not affect the recorded data until the R3D file gets converted into another format. If newer gamma curves are released, these R3D files can therefore be re-developed using the most recent color science.

Regardless, options are available for either common post-production route. With dailies, stills and personal projects, or when capture to post-production is handled in-house, REDgamma4 gives the simplicity and speed of a mainstream DSLR camera. With coordinated projects involving visual effects and third party post-production, or when libraries of custom LUTs have been developed using the Cineon standard, REDlogFilm gives the familiarity of scanned film—but with full digital flexibility.


.

Get Inspired : Adobe Color CC with Lumetri Color Tool

ADOBE COLOR CC

Adobe Color CC is a very helpful tool for artists and designers that allows them to capture five colors through whatever is being viewed through their iOS device’s camera. And, it works flawlessly.

What makes Adobe Color CC so incredibly useful for creative types is that it’s so simple to use — simply point your camera and snap a photo. You’re then given an accurate color palate, including HEX codes and RGBS numbers to import into your preferred program (which is likely Adobe Photoshop if you’re reading this). After you’ve taken a photo, you’re then able to name your color theme for later use. The color theme is automatically added to your Creative Cloud library, allowing easy integration with Photoshop and Illustrator. The theme is also automatically synced to the Color service, which also allows you to use it in Photoshop and Illustrator, as well as InDesign and Adobe’s other mobile apps like Illustrator Draw.

Even though Adobe Color CC generally captures the exact color of an object, you’re able to bring the color into an interactive color wheel to allow you to edit and refine your color theme to exactly how you want it. Colors can also be shared, tagged and commented on through email, Facebook and Twitter, as well as other users of the Adobe Color CC.

Adobe Color CC is a simple but intuitive tool, and an absolutely necessary iOS app for illustrators and designers. Being able to not only grasp a color from the real-world, make it digital, and then edit the color as necessary is quite a useful thing to be able to do. Head over to theApp Store to download this gem for free.

Learn How it Works- Adobe Color CC?

LUMETRI COLOR TOOL

A true color correction panel into Adobe Premiere Pro is the best thing the application has seen in years. 

The Lumetri color panel brings simplicity and ease of use via Photoshop/Lightroom-like tools to an application that was extremely challenging to do color work with before.

Pros:

  • Super simple interface
  • Multiple panels that work depending on how you like to adjust color
  • Linked with Adobe Hue
  • Built-in LUTs that allow you to immediately play with color grades
  • The Color Wheel pane is designed very intelligently, and should reduce the chances of “over-cooking” a scene
  • Sharpen option works really well

Cons:

  • The built-in LUTs are only ok, nothing jaw dropping
  • Renders after utilizing the color panel can take a while to process.

Learn How to use Lumetri?

KING OF CREATIVE DI - ASSIMILATE SCRATCH 8.3

Experience the highest levels of creative DI with SCRATCH®. Feel the speed of real-time for ultimate productivity.

THE NEW UPDATE 8.3 features :

Full resolution support for RED, ARRI, Sony, Canon, Panasonic, DLSR and all other popular camera and media formats

Real-time full resolution, native playback of all popular camera formats

  • Fully ACES compliant
  • Oculus Rift VR360 file format including Cylindrical, Equi-rectangular, and Cube formats, for output to a secondary monitor, or an Oculus Rift DKI or DKII
  • REDCODE RAW.r3d including monochrome footage. Support for multiple RED Rocket cards with DRX control
  • RED Dragon
  • ARRIRAW including new ASSIMILATE customARRI fast Debayer – built for significant speed while still preserving color accuracy
  • Sony F5/F55/F65 including 6K and 8K
  • SONY Mpeg-2 .mp4, .mov and XAVC HD/4K .mxf
  • Phantom
  • SI2K
  • Panasonic RAW, P2/MXF and AVCHD
  • Canon C500, C300, Magic Lantern (.raw and .mlv), 5D, 7D5D, 7D
  • Blackmagic Design Cinema DNG, BMDPocket camera
  • Vanguard Video H.264 encoding (Mac and Windows)
  • Aaton Penelope
  • Ikonoscop
  • GoPro
  • QuickTime
  • DPX
  • Over 50 additional formats

    Powerful finishing tools

  • Shot Versioning: SCRATCH CONstruct manage multiple versions of the same 2D or 3D shots within the same timeline for easy comparison
  • Vector paint
  • Subtitling support
  • Apply OFX plug-ins to create a wide range of visual effects
  • Direct Output: Real-time tools for frame-rate conversion, image-resolution scaling and frame-accuracy to monitors, projectors and tape decks using both DVI and SDI interfaces
  • Multiple Deliverables: Create alternate versions in different resolutions, image formats and framing, all from a single source
  • Fast, highly interactive color grading

  • An entirely new, flexible viewing model

  • High-speed conform and confidence checking

  • Mix-and-match RED.r3d files with ARRIRAW or Phantom (or any other media format recognized by SCRATCH), even Canon DSLR, within the same resolution-independent timeline
  • State of the art metadata and timecode support

  • Advanced audio sync

  • Stereo 3D workflow support

  • Live View™

    Flexibility and extensibility

    Future-proof your workflow with an advanced and scriptable XML back-end that allows you to:

  • Automate SCRATCH to maximize productivity
  • Access your job anywhere via HTML
  • Integrate SCRATCH via XML with other tools in your workflow such as Nuke, Shotgun, Avid or Final Cut Pro
  • Enhance SCRATCH with OFX plug-ins such as Sapphire, Beauty Box, Twixtor, and Neat Video
  • Built-in SQL database supports a full range of metadata


  • System Requirement
  • OSX 10.7 and up
  • Windows 7 and up
  • CPU

  • Min. preferred: Intel i7 Quadcore
  • GFX

  • Preferred: Quadro K500, K6000 / Firepro W8000, W9000
  • OSX: NVIDIA 4000, K5000, ATI Radeon 5770 / 5870, FirePro D500 / D700
  • RAM

  • Min 8Gb, Preferred 12Gb
  • SDI

  • AJA Kona, T-Tap, Io
  • Bluefish444 Epoch
  • BlackMagic DeckLink, UltraStudio
  • NVIDIA Quadro 6000SDI on Windows

    FREE DOWNLOAD TRIAL VERSION HERE.

Dolby Vision - HDR & Future

Technology has moved far beyond current TV and movie imaging standards. Dolby Vision takes full advantage of what’s possible. This end-to-end solution delivers a dramatically different visual experience that fully expresses the original creative intent. Dolby Vision enhances today’s viewing experiences and is ready for the next wave of innovation from TV, movies, games, and streaming services.

The Dolby format offers a high dynamic range (HDR), meaning a wider range between the whitest whites and blackest blacks in a picture, along with features including a greater contrast ratio and color gamut. It can be projected in theaters with a Dolby Vision projection system that use Christie laser projectors.


Dolby researched human visual perception of luminance changes, then developed a new quantization curve based on those findings. The goal was to specify brightness levels from 0 to 10,000 cd/m2 using 10-bit or 12-bit encoding. The resulting PQ curve, approved as SMPTE Standard 2084, replaces gamma for Dolby Vision image encoding. In post-production, this means the image must be graded twice—one time for the standard P3 color space that most cinema viewers will see, and then again in the PQ format that specifies characteristics of the HDR version. Read this 2014 SMPTE presentation by Dolby Labs researcher Scott Miller for the nitty-gritty. 

Disney's Tomorrowland -- the first theatrical release in Dolby VIsion.

Disney's Tomorrowland -- the first theatrical release in Dolby VIsion.

Tomorrowland was graded on DaVinci Resolve already has ablility to grade and master in Dolby Vision Format.